I love homemade croissants! They make your house smell amazing and the dough is such a soft supple and satisfying texture to work with. They take a little time and planning but the effort level is minimal, you just have to carve out the time to make them right!

Homemade vs Store made Croissants
I have been through a few different variations of recipes and some have not worked quite as well as this one has for me. I had a little bit of a misconception in my head that croissants were just a piece of puff pastry rolled up and baked, when in fact they are a yeasted dough that has butter folded in like puff pastry.
Now if you knew that and I didn't, forgive me. In culinary school, I was in the Culinary program, not the Baking one, and even though I was in the bread club, our efforts were not focused on croissants. That said they have been something that I have been learning about and playing with on my own recently.
All that said, I think many of the pastries that we find in America that are called croissants are indeed rolled puff pastry. I have found that as light and beautiful as a real croissant dough, it just doesn't live up to what is mass-produced in grocery store bakeries. On top of the fact that those croissants are most likely made with shortening or margarine, so just know going in you won't achieve quite that pillowiness if you are using real butter.
But that is OK! I am ok with that fact knowing that I am using the best product that I can get my hands on instead of something that is one molecule away from being plastic.
Producing a GREAT homemade Croissant
The dough of these croissants starts in your stand mixer. I am already a fan because I love it when I can take the guesswork out of a recipe and "mix the dough until smooth". It means that I can recreate this time and time again and have similar results!
The yeasted dough then ferments in a warm place until doubled in size for about an hour. It is then rolled out and chilled before adding the butter. This step is important because we don't want the butter to begin to melt and be absorbed by the dough. The soft butter is then worked in before the dough is folded and chilled many times before it is rested overnight to allow it to relax and to let the yeast work its magic.

After the dough is rested it is ready to be stretched, cut, and formed. And because we are working with a yeasted dough it will be fermented a second time and proofed before baking allowing more air to rise the dough making it fluffier and flakier.

Then we are ready to egg wash and bake. This is the best part because your house is about to become filled with the sweet aroma of butter and yeast. It is one of the best smells ever, your gonna think you live inside a french bakery for a while!

There isn't much that is better than a freshly baked croissant. They are crisp, crunchy and flaky in all the best ways!

📖 Recipe
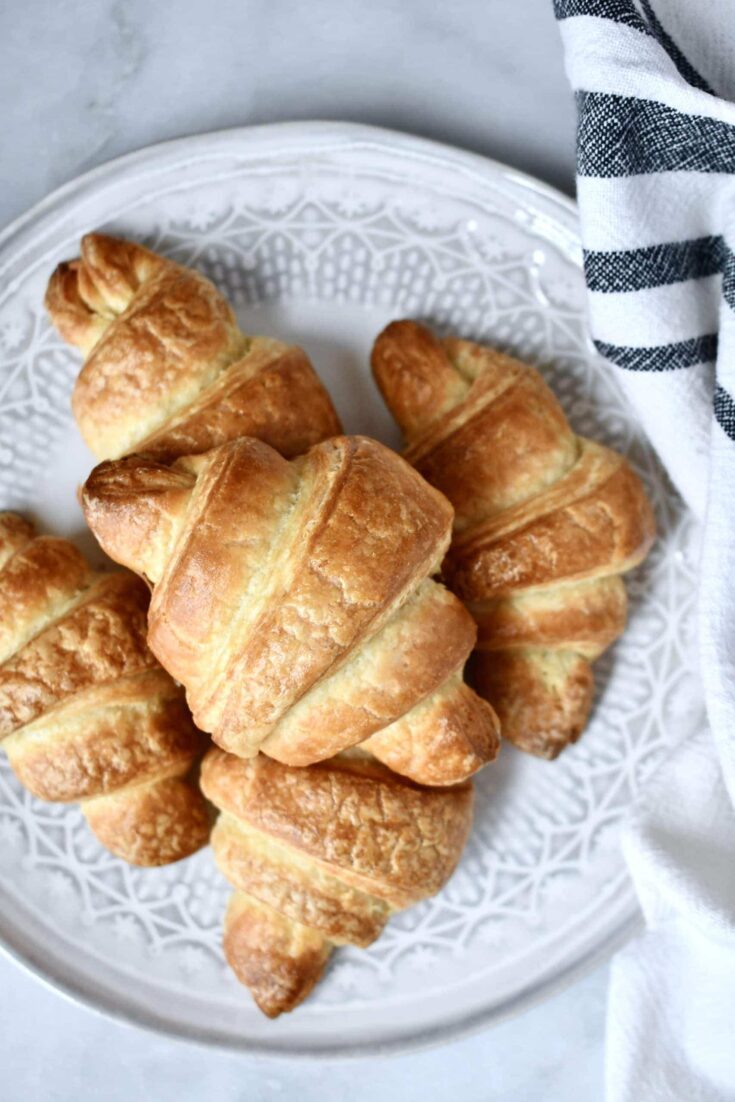
Bakery Style Croissants
This is a recipe that will yield a very professional style baked good that you can make at home! I am sharing the recipe in a metric format because it yields a finer result.
Ingredients
- 225 g/8oz Whole Milk
- 15 g/.5oz Active Dry Yeast
- 15 g/.5oz Granulated Sugar
- 8 g/.25oz Kosher Salt
- 40 g/1.5oz Butter, softened
- 400 g/14oz Bread Flour
- 225 g/8oz Irish Butter, room temp
- 1 lg Egg
- splash of water
Instructions
- In a small saucepan, warm the milk to between 110-115 degrees Fahrenheit. If you overheat it, allow it to cool to this temperature before adding the yeast. Dissolve the yeast in the warm milk and let it sit for 5 minutes.
- In a stand mixer fitted with the paddle attachment add the sugar, salt, butter, and bread flour as well as the warm milk and bloomed yeast. Mix on low speed until the dough comes together and is smooth and no longer powdery. Do not over mix, just bring the dough together, we do not want to develop gluten at this point.
- Cover the bowl and rest in a warm place, about 80 degrees, for about an hour or until doubled in size.
- When the dough has doubled, remove it from the bowl and place it on a sheet pan. Spread it out using your hands or a rolling pin, into a 14x10 inch rectangle. Cover and let rest in the refrigerator for 30 minutes.
- After the 30 minute resting time, spread the room temperature butter over ⅔ of the dough in an even layer. Using the letter turn method fold the unbuttered 3rd over the middle and the buttered 3rd over top. Rotate the dough 90 degrees and roll the dough out into a long rectangle and fold again in the same manner. This enclosed the butter and gives us our first "turn" or fold.
- Rest the dough 30 minutes and repeat the rolling and give the dough another fold or "turn". Rest and repeat for a third time, tightly wrapping the dough in plastic during each resting period.
- After the dough has been turned 3 times, tightly wrap and rest overnight, or 8 hours minimum.
- When the dough has rested overnight it is ready to be rolled and shaped. Remove the dough from the fridge and allow to warm up for only 10 minutes.
- Cut the dough in half and roll to a length of about 10 inches but ⅛th inch thick. Lengthwise cut triangles that are about 3 inches wide at the base. Alternating the base at the top and bottom of the dough will give you the best yield with minimal scrap.
- To form the croissant, stretch out the bottom corners gently and begin tightly rolling. Give the tail a slight stretch and roll until the tail is on the bottom of the roll. Be sure to keep the tails on the bottom so the croissants don't pop open during baking. Continue rolling until all the dough is formed. Place the formed croissants on a baking tray and proof in a warm oven until doubled in size and a tiny bit of butter starts to release.
- Remove them from the oven and heat it to 400 degrees.
- Brush the croissants with an egg wash of one egg and a splash of water beat to smooth.
- Bake at 400 degrees for about 20 minutes or until golden brown.
Nutrition Information:
Serving Size:
1 gramsAmount Per Serving: Unsaturated Fat: 0g
Make them Mardi Gras King Cake Croissants by drizzling a little powdered sugar glaze over them and dusting with festive sugar colors. Combine ½ C powdered sugar and 1 tablespoon of water in a bowl and to create a glaze. Add more water if needed, the glaze should be thick but pourable.

Did you make this recipe? Let me know by leaving a review or comment! And be sure to sign up for my newsletter, and follow along on Instagram, Pinterest, and Facebook!
Did you make this recipe? Let me know by leaving a review or comment! And be sure to sign up for my newsletter, and follow along on Instagram, Pinterest, and Facebook!
[wprm-recipe-roundup-item id="13280"]


Lori says
I have make these! They look amazing!!
Kendell says
They are so freaking delicious! Do it, you won't regret it!